Asset Manager Help Guide
The Asset Manager screen within the Experiture platform serves as a central hub for organizing, storing, and managing the digital assets used in your marketing campaigns
Whether you are working with images, documents, or other media files — the Asset Manager allows you to keep track of assets, ensure consistency across campaigns, and streamline the creative process. In this Help Guide, we will walk through the key functionalities of the Asset Manager, how to interact with its various features, and how it can benefit your workflow.
What is the Asset Manager?
The Asset Manager screen in Experiture is an invaluable for keeping your marketing assets organized, accessible, and easy to manage. By providing a central location for uploading, categorizing, and retrieving files, the Asset Manager simplifies the creative process and ensures that marketers can focus on delivering high-quality campaigns without the distraction of misplaced files or disorganized asset libraries.
Whether you’re working on digital or physical campaigns, the Asset Manager provides a streamlined, efficient way to manage your assets, making it a must-use tool for all marketing teams using the Experiture platform.
Many businesses have a set of brand assets that are used across all marketing efforts, such as logos, color swatches, and font files. Storing these in a dedicated folder within the Asset Manager ensures that all team members have access to the same brand materials, maintaining consistency in messaging and visuals across channels.
For example, Assets stored here may include:
- Images used in email headers or body content
- PDFs or documents shared through email attachments
- Icons or brand logos that are reused across multiple campaigns
Asset Manager Overview

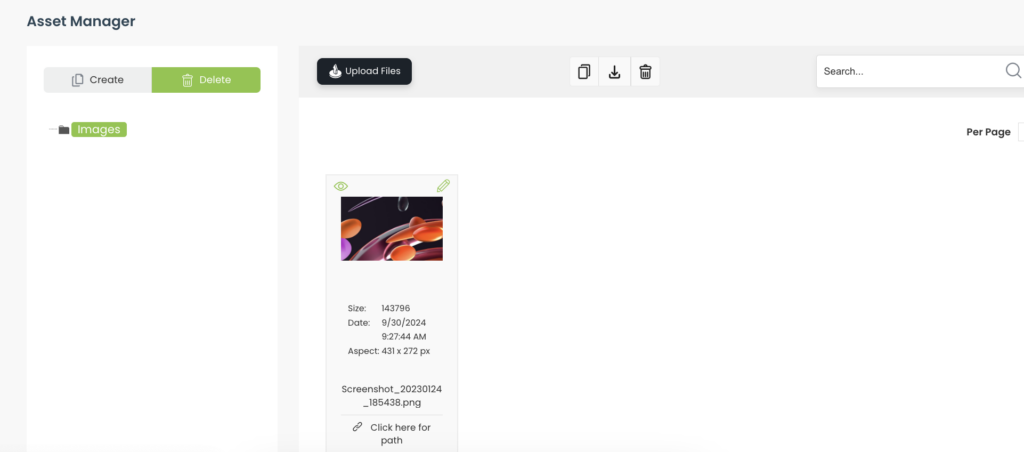
When you first navigate to the Asset Manager, you are presented with a clear and user-friendly interface. The screen is divided into two primary sections:
- Folder Navigation Pane (left side) – A hierarchical view of folders where you can store and organize different types of assets (e.g., images, videos, documents).
- Asset Display Area (right side) – A grid or list view of the assets within a selected folder, including thumbnails, file sizes, creation dates, and other metadata.
The default setup typically includes a folder for Images, though users can create additional folders to categorize their assets as needed.
Searching for Assets

The Search bar at the top right of the Asset Display Area allows users to quickly locate specific files. Simply type in part of a file name or a keyword associated with the asset, and the system will display any matching files.
To reset your view, hit the “Reset” (circular arrow) icon.
This is especially useful when managing large amounts of assets for ongoing campaigns, as it saves time and reduces the potential for errors when finding the correct file.
Per Page Asset Display
To help manage how many assets are displayed at once, the Per Page dropdown allows users to control the number of assets shown on the screen. This helps when dealing with large numbers of files, making it easier to browse and locate specific items without scrolling endlessly.
Asset Manager Functionality
Uploading Files

At the top of the Asset Display Area, you’ll find the Upload Files button, which allows you to upload media directly into the Asset Manager. When you click the button, a file upload window will appear, enabling you to select files from your computer to upload to the platform.
Once uploaded, your files will be displayed as thumbnails with accompanying details, such as:
- Size (e.g., 143796 KB)
- Date the asset was uploaded
- Aspect Ratio of the file (e.g., 431 x 272 pixels for images)
- File Name (e.g., Screenshot_20230124_185438.png)
This metadata ensures that users can quickly scan for and locate specific files when working on campaigns.
Creating and Organizing Folders

To keep your assets organized, the Create button, located on the left-hand navigation pane, allows you to create new folders. These folders help organize assets by category, campaign, or asset type. For example, you might create separate folders for:
- Email Assets
- Landing Page Assets
- Direct Mail Assets
- Product Photos
Once a folder is created, simply drag and drop files into the appropriate folders.
Managing Assets
You can create a copy of an asset, download it for offline use, or delete any asset by selecting it and clicking the download button, located at the top of the Asset Display Area.

- Copy: Copy an asset if you would like to create a slight variation for use in a marketing asset.
- Download: Download the asset for use offline, or to modify it using an offline system.
- Delete: If an asset is no longer needed, click the trash icon to remove it from the Asset Manager. NOTE: This operation cannot be undone.Each asset within the Asset Manager has multiple management options, accessible from the Asset tile.
Additionally, you can “View” (Eyeball icon) or “Edit” (Pencil icon) the Asset from the tile itself.

- View: The eye icon allows you to preview an image or asset without needing to download it.
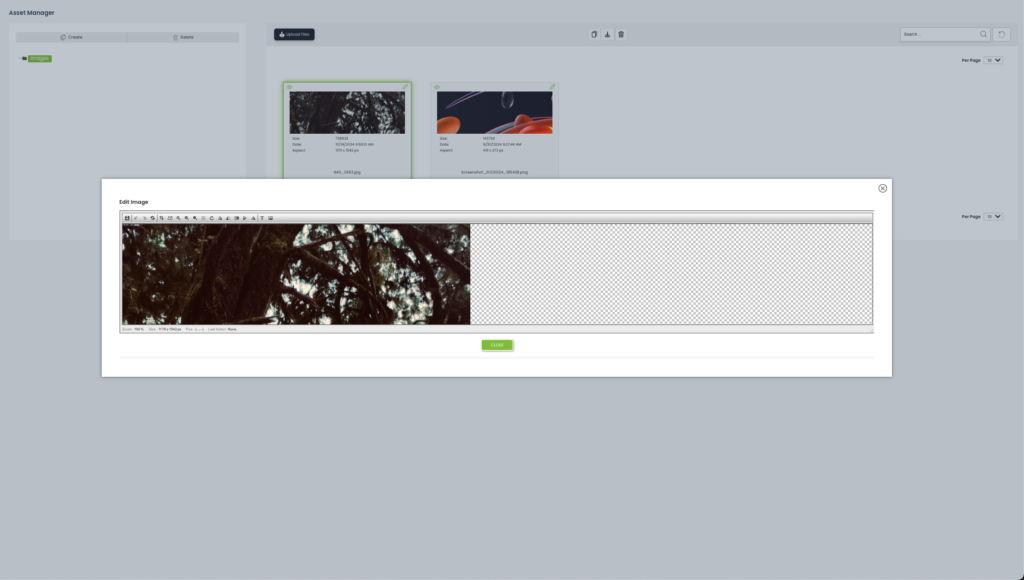
- Edit: By clicking the pencil icon next to an asset, you can edit the Asset in the Asset Edit screen. The Edit Asset screen is a convenient tool for making basic adjustments to images without needing external software, streamlining the process for marketers working directly within the Experiture platform.

This screen is designed to give users basic editing capabilities for assets such as resizing, cropping, and other modifications before they are used in campaigns.
Key Features of the Edit Asset Screen
- Image Display and Editing Pane (Center):
- This pane shows the selected image and provides a real-time preview of any changes made. You can zoom in/out, pan the image, and perform various modifications within this view.
- At the bottom of the pane, the image’s current zoom level and size (in pixels) are displayed. This helps ensure the image fits your campaign’s needs in terms of dimensions.
- Editing Toolbar (Top of Pane):
- The toolbar includes a variety of tools for basic image manipulation:
- Undo/Redo: These buttons allow you to reverse or reapply recent changes.
- Resize: Adjust the width and height of the image, either maintaining its aspect ratio or changing it to custom dimensions.
- Crop: Select and remove unwanted portions of the image. The cropped area will remain visible in the editing pane until finalized.
- Rotate/Flip: Rotate the image to the left or right, or flip it horizontally or vertically to achieve the desired orientation.
- Draw/Annotate: Some versions may include tools to mark or annotate images directly.
- Color Adjustments: Basic brightness, contrast, or saturation sliders may be available for quick adjustments.
- The toolbar includes a variety of tools for basic image manipulation:
- Action Buttons (Bottom of Pane):
- Save/Close: Once your edits are complete, click the green Close button to save changes and return to the Asset Manager.
- The editing pane does not automatically save changes. This provides flexibility, allowing you to experiment with various edits before committing to them.
- Asset Information (Top of Screen):
- Just above the editing pane, you can see details about the asset, such as its size, dimensions (in pixels), aspect ratio, and the upload date. This information is useful for ensuring the asset meets the resolution requirements of your campaign.
How to Use the “Edit Asset” Screen
- Select the Image: First, locate and select the image you wish to edit from the Asset Manager (as shown in the background). Once selected, click on the edit icon (pencil) next to the asset to open the “Edit Asset” screen.
- Make Adjustments: Use the toolbar to resize, crop, or rotate the image as needed. If necessary, you can undo changes using the Undo button.
- Preview Changes: The editing pane gives you a live preview of your changes, so you can see how the adjustments impact the image.
- Save and Close: Once satisfied with the edits, click the Close button to apply your changes. The edited image will now be available in its updated form for use across the platform.
Common Use Cases for the Edit Asset Screen
- Optimizing Image Dimensions: Ensure your images fit perfectly within email templates, landing pages, or direct mail pieces by adjusting the size and resolution.
- Cropping for Focus: Remove unnecessary parts of the image to better align with the design aesthetic or focus on key elements.
- Standardizing Image Orientation: Rotate or flip images to maintain consistency across visual assets in a campaign.
