Utilizing the Append View window
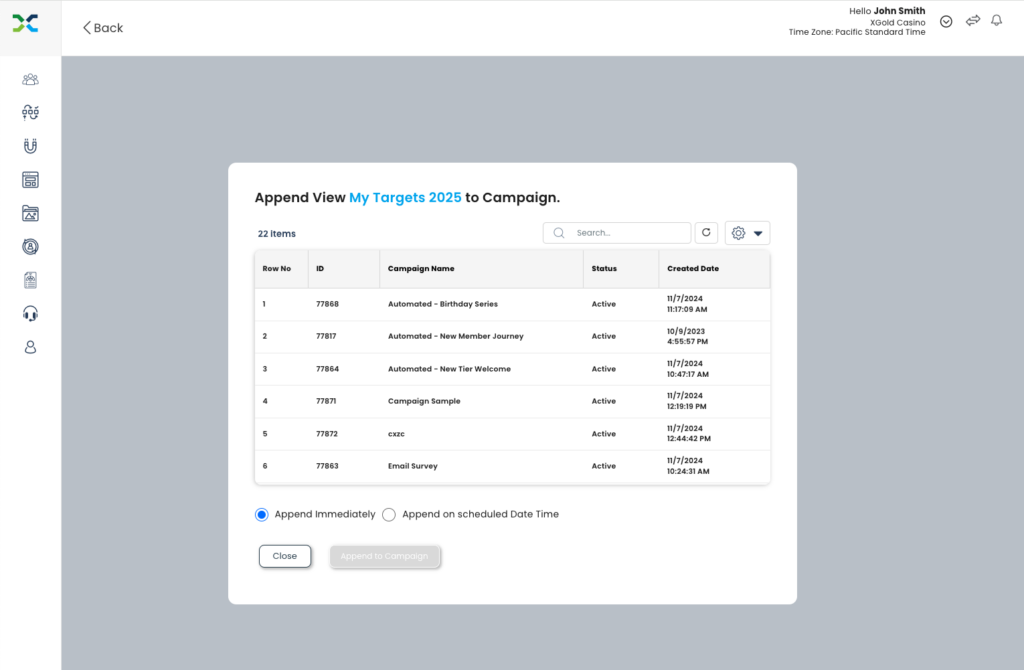
The Append View Window in Experiture is used to facilitate the process of linking Audiences (a collection of Targets) to a Campaign. This action, called “Appending,” enables users to develop personalized marketing material to the selected audience via channels such as Email, SMS, and even physical Print. This document provides a detailed breakdown of the Append View Window, explaining each part of the interface and how to use it effectively.
Overview of the Append View Window
The Append View Window consists of several components, each designed to help you efficiently locate, select, and append an Audience to an appropriate Campaign. Below, each section of the window is explained in detail.
Current Audience Information
The Audience Information Header provides critical context for the Append View process:
- Audience Title:
- Clearly identifies the Audience you are working with. For our example, the title reads “Append View My Targets 2025 to Campaign,“ indicating that the Audience “My Targets 2025” is being appended.
Search and Filter Options
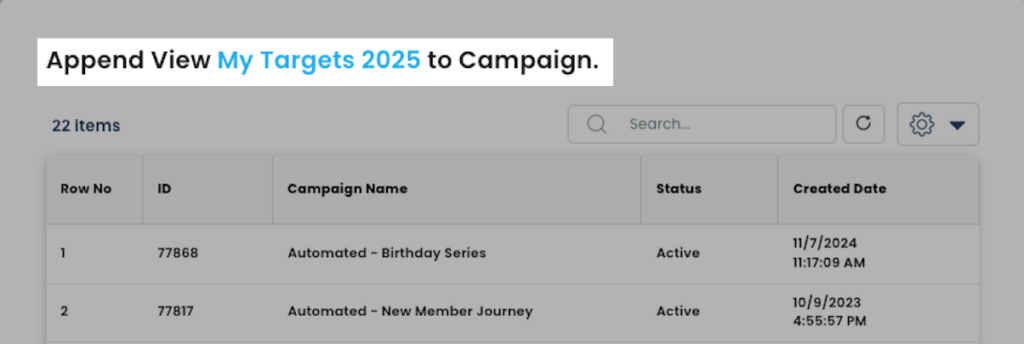
Directly below the Audience Information Header are the Search and Filter Options. These tools are provided to help you locate specific Campaigns quickly.
- Item Number:
- Details the total number of Campaigns currently being displayed.
- Details the total number of Campaigns currently being displayed.
- Search Bar:
- Enter keywords to filter the Campaign list dynamically. For example, typing “HTML” will narrow the list to show only Campaigns containing “HTML” in their name or other relevant fields.
- As you type, the table updates automatically to display only matching results.
- Enter keywords to filter the Campaign list dynamically. For example, typing “HTML” will narrow the list to show only Campaigns containing “HTML” in their name or other relevant fields.
- Reset Button:
- Clears any filters or keywords in the Search Bar and restores the full list of Campaigns.
- Clears any filters or keywords in the Search Bar and restores the full list of Campaigns.
- Gear Icon:
- Allows users to export a .csv file of various Campaign details such as ID, creation date, and status. This is great for users who are in need of an offline option for reviews/audits.
Selecting Your Campaign
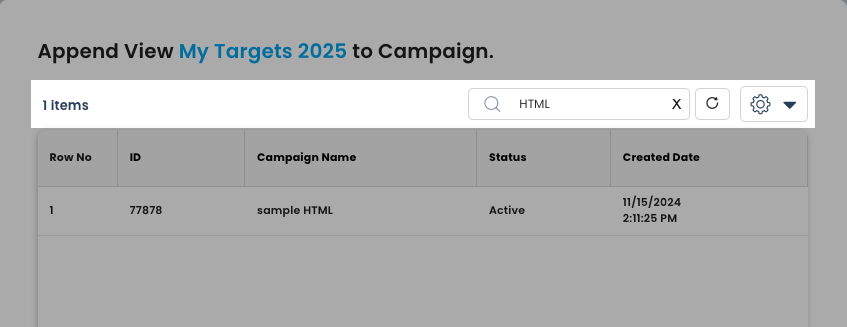
The Campaign Selection Grid is the primary area where users choose which Campaign will receive the Audience. It contains a structured list of all eligible Campaigns.
- Table Columns:
- ID:
- A unique numerical identifier for each Campaign, useful for internal tracking and system reference.
- A unique numerical identifier for each Campaign, useful for internal tracking and system reference.
- Campaign Name:
- The name of the Campaign, offering a brief description of its purpose (e.g., “Automated – New Member Journey” or “Campaign Sample”).
- The name of the Campaign, offering a brief description of its purpose (e.g., “Automated – New Member Journey” or “Campaign Sample”).
- Status:
- Indicates the current operational state of the Campaign:
- Active: Campaigns that are ready to receive appended Audiences.
- Paused: Campaigns that are paused or no longer running.
- Active: Campaigns that are ready to receive appended Audiences.
- Indicates the current operational state of the Campaign:
- Created Date:
- Displays the date and time the Campaign was created, helping users locate recent or relevant Campaigns.
- Displays the date and time the Campaign was created, helping users locate recent or relevant Campaigns.
- ID:
Append Options
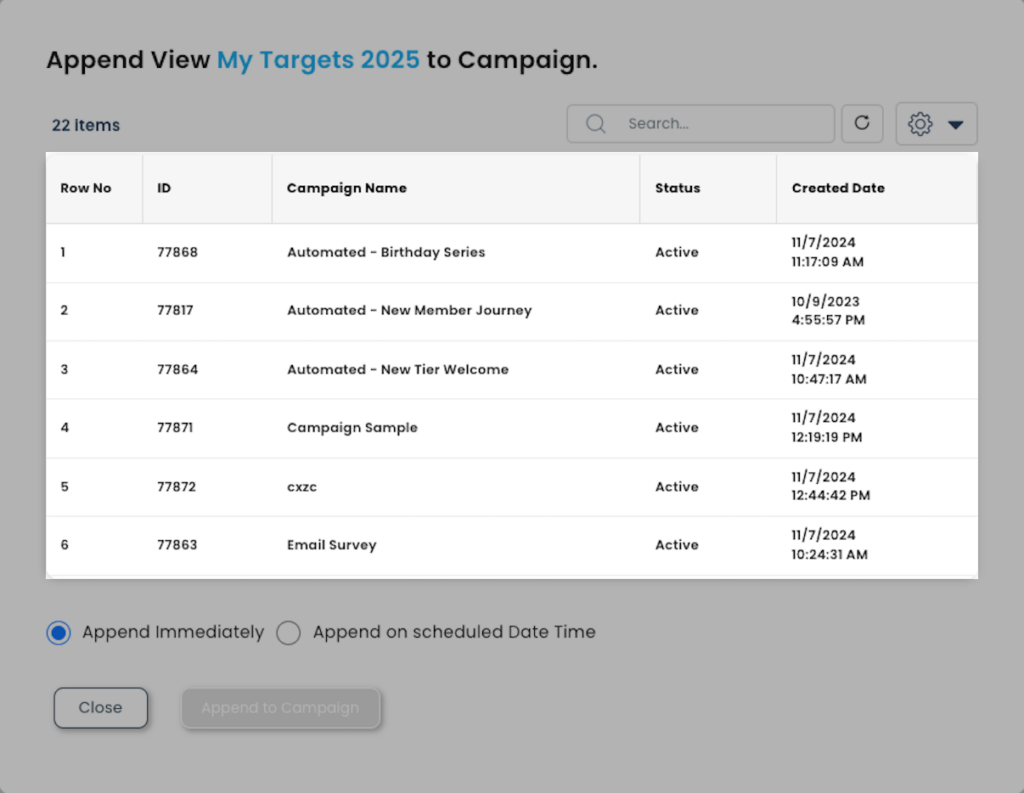
Just below the Campaign Selection Window are the Append Options. Here you can choose whether you’d like to Append immediately, or wait for a specified date and time.
- Append Immediately:
- The Audience is appended to the Campaign as soon as you confirm your selection by clicking the Append button.
- Best for urgent updates or when no scheduling is needed.
- The Audience is appended to the Campaign as soon as you confirm your selection by clicking the Append button.
- Append on Scheduled Date Time:
- Allows you to specify a future date and time for the append action.
- Useful for aligning with planned Campaign launches or other strategic timing needs.
- Allows you to specify a future date and time for the append action.

Action Buttons
Directly under the Append Options are a set of Action Buttons that allow you to close the window or Append to Campaign.
Please note: The Append to Campaign button will not be clickable until you select a Campaign.

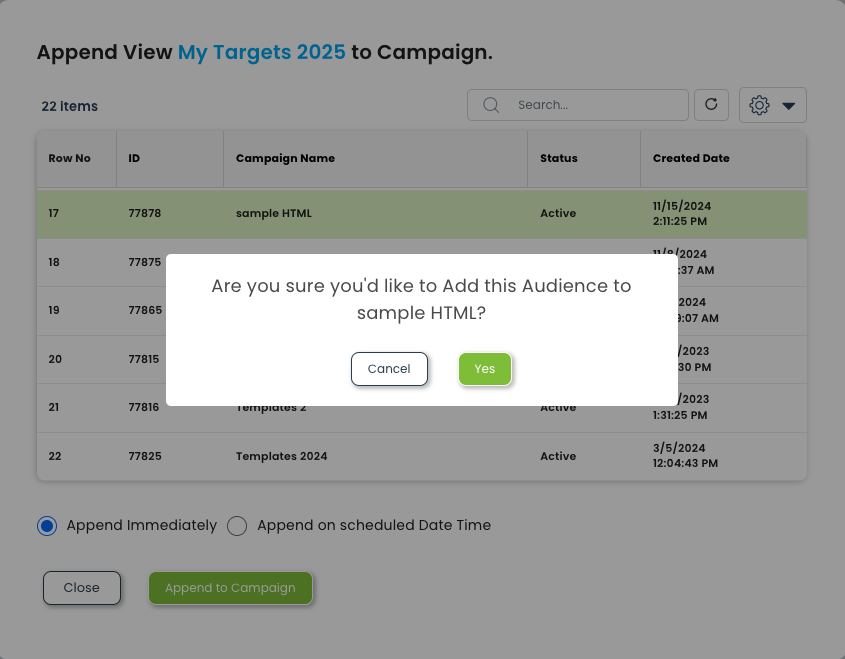
After clicking “Append to Campaign,” you’ll be presented with a confirmation window, displaying your selected Campaign and giving you a chance to make any final changes.
Additional Tips for Using the Append View Window
- Naming Conventions: Use clear, descriptive names for your Campaigns. This makes them easier to locate using the Search Bar or filters.
- Campaign Status: Always ensure the Campaign you’re appending to is marked as “Active.”
- Scheduled Appends: Double-check your selected date and time for scheduled appends to ensure they align with your marketing strategy.
- System Confirmation: After appending, verify that the Audience has been successfully added by checking the Campaign details in the main Campaign dashboard.
